 Pin It
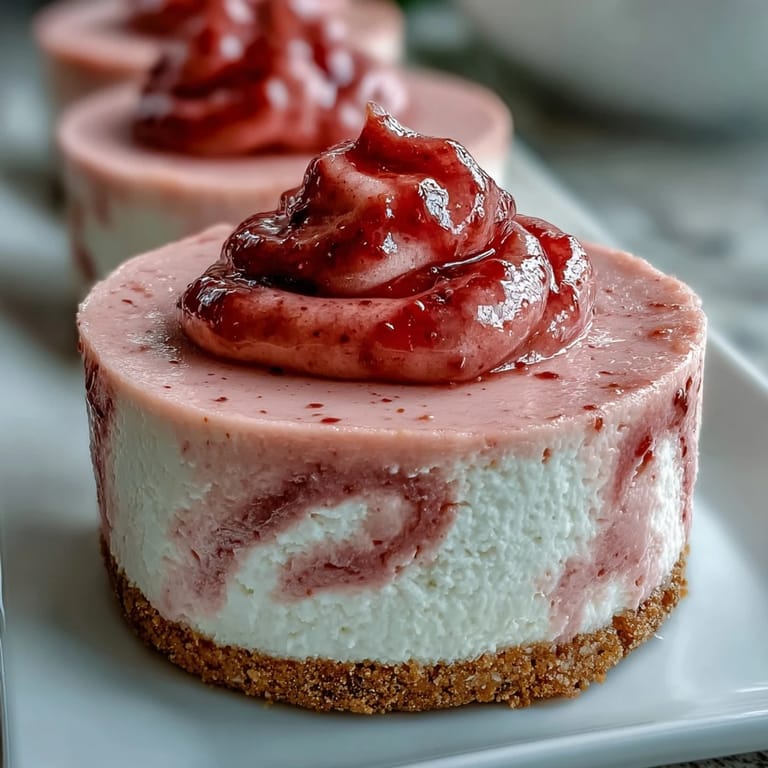
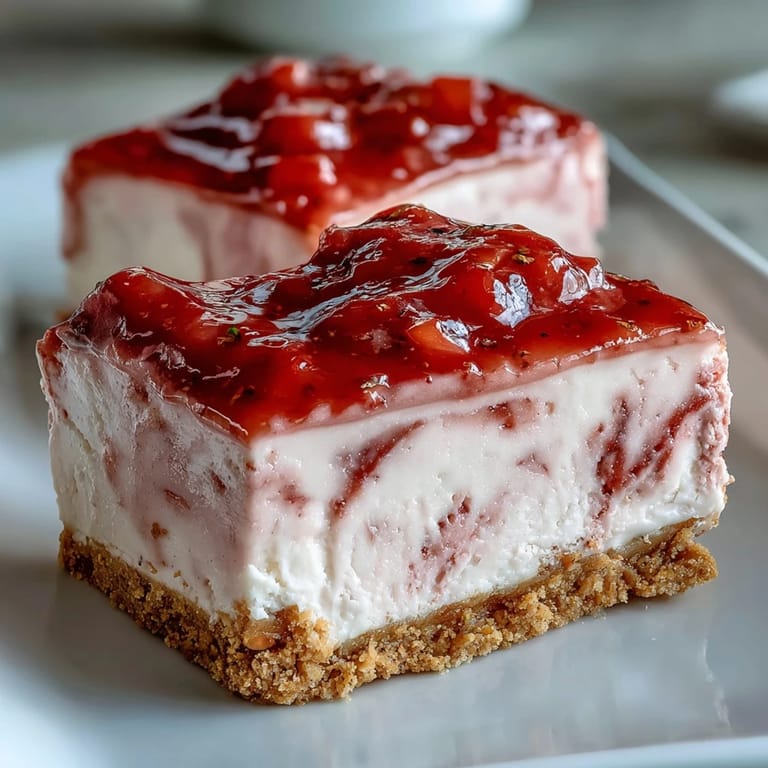
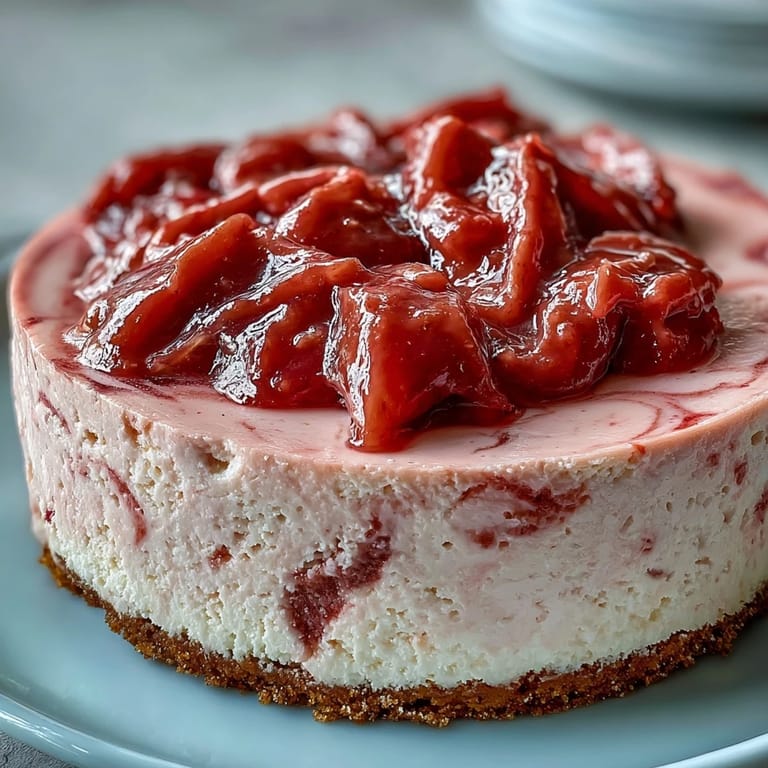
 The first time I encountered guava cheesecake was at my abuela's house in Miami, where the scent of tropical fruit always mingled with coffee and cinnamon. She'd somehow managed to combine the creamy New York style she'd learned from American neighbors with the bright pink guava paste that every Latin pantry seems to hold. When I tried recreating it years later in my tiny apartment kitchen, I accidentally bought guava marmalade instead of the solid paste, and that happy mistake became the secret to getting those gorgeous ribbons throughout the filling instead of a dense layer on top.
I made this for my roommate's birthday dinner last spring, and our usually quiet kitchen became the most popular room in the apartment. Everyone kept drifting in, drawn by the perfume of baking cheesecake and that unmistakable fruity aroma that fills your whole home. When I finally pulled it from the oven hours later, the marbled pink veins running through the cream looked like something from a bakery window, and my friend actually gasped when she saw it.
Ingredients
- 200 g Maria cookies or digestive biscuits: These buttery slightly sweet cookies create a foundation that's crisp yet tender, and they somehow taste more sophisticated than grahams
- 80 g unsalted butter, melted: Don't even think about using cold butter here, because the hot melted version coats every crumb evenly for that crucial pressable texture
- 2 tbsp granulated sugar: Just enough to bridge the gap between the cookie's natural sweetness and what a crust really needs to hold its own
- 600 g cream cheese, softened: I learned the hard way that room temperature is nonnegotiable, because cold cream cheese creates those tiny stubborn lumps that ruin the silky finish
- 200 g granulated sugar: This amount hits the perfect sweet spot without competing with the guava's natural tartness
- 200 ml sour cream: The secret ingredient that adds a slight tang and makes the texture almost mousse like rather than dense
- 3 large eggs: Add these one at a time and don't overbeat, because too much air creates bubbles that can lead to cracking
- 1 tsp pure vanilla extract: Pure vanilla makes all the difference here, tying together the creamy elements with the bright guava
- Zest of 1 lime: Completely optional but I highly recommend it, because that subtle citrus brightness makes the tropical flavors sing
- 200 g guava marmalade or paste: Marmalade gives you those effortless swirls, while paste needs more water but delivers a more concentrated guava punch
- 2 tbsp water: Only needed if your guava is thick, but this little bit of liquid turns stubborn paste into something that flows beautifully through the batter
Tired of Takeout? 🥡
Get 10 meals you can make faster than delivery arrives. Seriously.
One email. No spam. Unsubscribe anytime.
Instructions
- Get your oven and pan ready:
- Preheat to 160°C 320°F and line a 23 cm 9 inch springform pan with parchment, then grease the sides because even a little sticking can ruin that perfect first slice
- Build the crust foundation:
- Crush those Maria cookies into fine crumbs, then toss with melted butter and 2 tbsp sugar until everything's evenly coated and smells like buttery heaven
- Press and bake the base:
- Firmly press the crumb mixture into your pan's bottom, then bake for 10 minutes to set the structure before the heavy filling goes on
- Create the creamy filling:
- Beat that room temperature cream cheese with sugar until absolutely silky, then fold in the sour cream until you can't see any white streaks
- Add the eggs gently:
- Drop in each egg one at a time, mixing just until incorporated, because overworking the eggs here is what leads to cracked cheesecakes
- Layer in the flavor:
- Stir in vanilla and that lime zest if you're using it, then pour this gorgeous batter over your cooled crust and smooth the top like you mean it
- Prep the guava swirl:
- Warm the marmalade with water in a small saucepan until it's loose and pourable, or mash and stir the paste until it reaches the same ribbony consistency
- Create the marble effect:
- Drop spoonfuls of guava all over the surface, then run a knife through in swirling patterns, but don't overdo it or you'll lose those beautiful distinct ribbons
- Bake to perfection:
- Slide it into the oven for 50 to 55 minutes, watching for edges that are set while the center still has that signature wobble
- The crucial cooling phase:
- Turn off the oven, crack the door, and let it cool gradually for an hour because this slow cooldown is what prevents those disappointing cracks
- The final patience test:
- Refrigerate for at least 3 hours or overnight, because this slice only achieves its true velvety potential after a good long chill
 Pin It
 This cheesecake has become my go to for dinner parties because it looks stunning and tastes like something from a professional bakery, but nobody needs to know how straightforward it actually is. My sister now requests it for every family gathering, and seeing people's faces when they cut into that first slice, revealing the pink marbled pattern inside, never gets old.
Mastering The Crust
A cheesecake is only as good as its foundation, and I've learned that pressing the crust into the pan with the bottom of a measuring cup creates the most even, compact layer. The key is pressing firmly enough that it holds together when sliced, but not so hard that it becomes a solid brick that's difficult to cut through.
The Swirl Technique
Getting those Instagram worthy marbled ribbons is easier than it looks, but the temperature of both components matters immensely. If your cheesecake batter is too cold and the guava too hot, they won't swirl together properly, so let the guava cool slightly before dropping it onto the surface.
Serving And Storage
This cheesecake actually improves after a day in the refrigerator, as the flavors meld and the texture becomes even more luxurious. Keep any leftovers well covered and they'll maintain their quality for up to five days, though in my experience it rarely lasts that long.
- Dip your knife in hot water and wipe it clean between slices for the cleanest cuts
- Let the cheesecake sit at room temperature for 15 minutes before serving for optimal texture
- The guava flavor intensifies overnight, so this is one dessert that's arguably better the next day
 Pin It
 Whether you're making this for a special occasion or just because Tuesday deserves something extraordinary, this guava cheesecake turns ordinary moments into something worth celebrating. There's something magical about cutting into that creamy marbled masterpiece and knowing you created it yourself.
Recipe FAQs
- → What makes guava cheesecake unique?
The distinctive guava marmalade swirl creates a beautiful marbled pattern while infusing tangy tropical sweetness throughout the creamy filling. This Latin American variation combines the classic richness of traditional cheesecake with vibrant fruit flavors.
- → Can I use fresh guava instead of marmalade?
Fresh guava lacks the concentrated sweetness needed for swirling. Simmer fresh guava with sugar until thickened into a preserves-like consistency, or use guava paste thinned with water for authentic flavor.
- → Why does the cheesecake cool in the oven?
Gradual cooling prevents cracking by allowing the structure to set slowly as the temperature decreases. Leaving the oven door cracked releases heat gently while protecting the delicate texture from sudden temperature changes.
- → What can substitute Maria cookies?
Graham crackers, digestive biscuits, or vanilla wafers work well as crust alternatives. Each brings slightly different flavor profiles—graham crackers add honey notes, while digestives offer a more subtle sweetness.
- → How long should cheesecake chill before serving?
Refrigerate for at least three hours, though overnight chilling yields the best texture and flavor. Extended chilling allows the guava swirl to set completely while the filling achieves perfectly creamy consistency.
- → Why does the center jiggle after baking?
Slight wobbling indicates proper texture—the center continues setting as it cools. Overbaking leads to dry, cracked results. The residual heat completes the cooking process gently.