Pin It
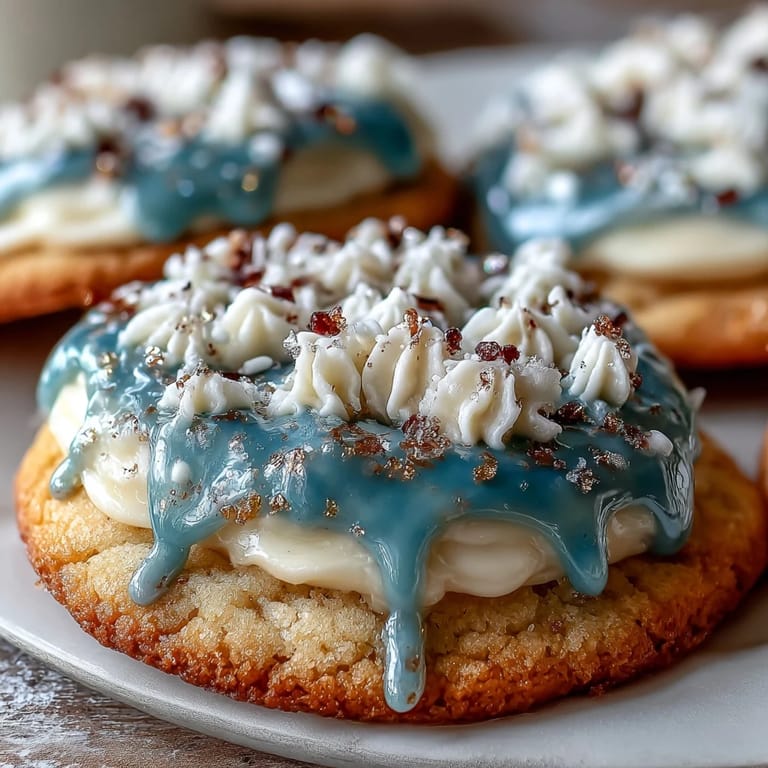
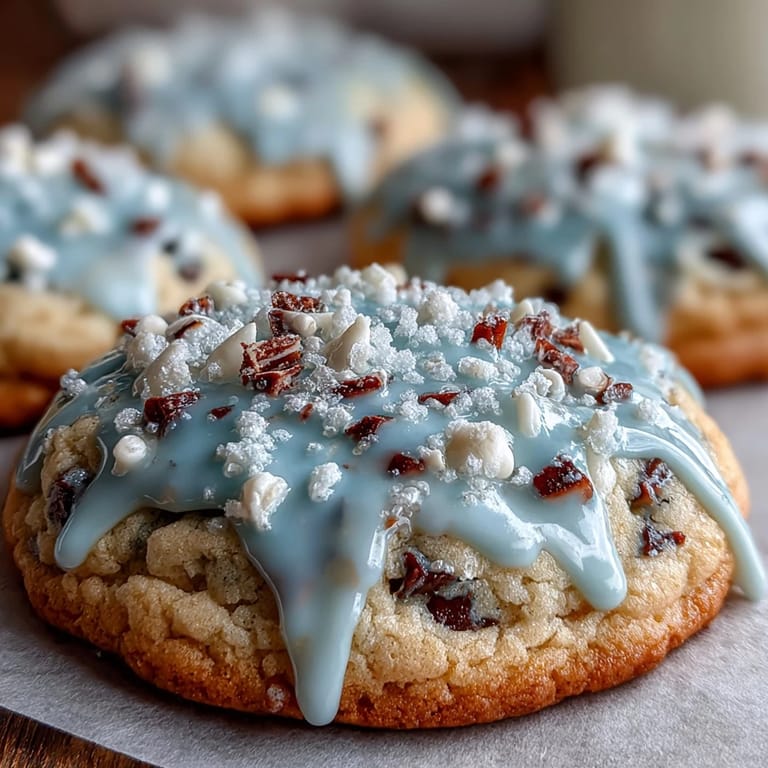
 There's something magical about the moment when butter and sugar transform into the foundation of something beautiful. I was scrolling through Cookie Run Kingdom one afternoon, mesmerized by Pure Vanilla Cookie's serene blue aesthetic, when I thought: what if I could actually bake that into reality? These sugar cookies became my answer—soft, vanilla-forward, and dressed up in glossy royal icing that catches the light like frosted glass. They've since become my go-to for themed celebrations, gifts, and quiet afternoons when I need to create something that tastes as lovely as it looks.
I'll never forget the afternoon my neighbor peeked over the fence and caught me piping blue swirls onto cookies fresh from the cooling rack. She asked what the occasion was, and when I said "just because," she came back ten minutes later with her daughter. Watching them decorate their own cookies with yellow gel and careful precision reminded me that these aren't just sweets—they're an invitation to slow down and make something together.
Ingredients
- All-purpose flour (2 1/2 cups): The backbone of your dough; sifting prevents lumps and ensures even mixing with the leavening agents.
- Unsalted butter (3/4 cup, softened): Softened butter creams properly with sugar, creating that light, fluffy base that makes these cookies tender rather than dense.
- Granulated sugar (1 cup): This is what gives the cookies their slight crispness at the edges while keeping the centers soft.
- Pure vanilla extract (2 tsp): Don't skip quality here; it's the soul of the flavor, especially when nothing else competes for attention.
- Baking powder (1/2 tsp): Just enough lift to give these cookies structure without making them cake-like.
- Egg (1 large): Acts as a binder and adds richness; room temperature eggs mix in more smoothly.
- Powdered sugar (2 cups, for icing): Must be sifted to avoid lumps that will clog your piping bags.
- Meringue powder (2 tbsp): This ingredient stabilizes the icing and helps it set hard; it's worth hunting down at baking supply stores.
- Gel food coloring: Use gel over liquid food coloring because it won't thin out your icing or throw off your water ratios.
Tired of Takeout? 🥡
Get 10 meals you can make faster than delivery arrives. Seriously.
One email. No spam. Unsubscribe anytime.
Instructions
- Whisk Your Dry Team:
- In a medium bowl, combine flour, baking powder, and salt, whisking together so they're evenly distributed. This step prevents baking powder from creating pockets of bitter flavor in random spots.
- Cream the Base:
- Beat softened butter and sugar for 2 to 3 minutes until it's pale and fluffy—listen for the mixer to sound lighter and notice the mixture's volume increase. This incorporates air that keeps cookies tender.
- Bring It Together:
- Add the egg, vanilla, and milk to your creamed mixture and beat until fully combined. The dough should look smooth and cohesive, not separated or greasy.
- Marry Wet and Dry:
- Add the flour mixture gradually, mixing on low speed just until the dough comes together. Overmixing develops gluten and makes cookies tough, so stop as soon as you don't see streaks of flour.
- Chill for Success:
- Divide dough in half, flatten each into a disk, wrap in plastic, and refrigerate for at least 1 hour. Cold dough is easier to roll and cut without sticking, and the rest allows flavors to meld.
- Ready the Oven:
- Preheat to 350°F (175°C) and line baking sheets with parchment paper. The parchment prevents sticking and ensures even browning on the bottoms.
- Roll and Cut:
- On a lightly floured surface, roll dough to 1/4-inch thickness and cut your shapes. Work quickly so the dough doesn't warm up too much, or it becomes sticky and loses its definition.
- Space Them Right:
- Place cookies 1 inch apart on prepared sheets, as they spread slightly during baking. Crowding them results in connected cookies that are harder to separate.
- Bake to Golden:
- Bake for 10 to 12 minutes until the edges just begin to turn golden but the centers still look slightly underbaked. They'll firm up as they cool, and this prevents overbaked, hard cookies.
- Cool with Patience:
- Let cookies rest on the baking sheet for 5 minutes to firm up, then transfer to a wire rack to cool completely. This resting period is crucial; moving them too soon causes breakage.
- Make Your Royal Icing:
- Combine sifted powdered sugar, meringue powder, vanilla, and 4 tablespoons warm water in a large bowl. Beat on low speed until smooth and glossy, adding water 1 teaspoon at a time if it's too thick.
- Color and Decorate:
- Divide icing into bowls and tint with gel food coloring to your desired shades. Use piping bags for detailed designs or squeeze bottles for quick coverage, and allow icing to set completely before stacking or packaging.
 Pin It
 There was a moment last winter when I boxed up a dozen of these cookies to give to my coworker who was moving away. She called me that evening and said she'd arranged them in a little pyramid on her new kitchen counter because they were too pretty to eat right away. That's when I realized these cookies do something beyond tasting good—they become little edible keepsakes, small enough to hold but meaningful enough to remember.
The Art of Cookie Decorating
Royal icing is its own beast, and I learned this the hard way by trying to eyeball water measurements. The magic ratio is somewhere between thick (like cake batter) and thin (like milk), and the only way to find your sweet spot is to add water slowly while testing on a spare cookie. Once you crack this, decorating becomes less stressful and more playful—you're not fighting the icing anymore.
Storage and Gifting
These cookies keep beautifully in an airtight container at room temperature for up to a week, though they rarely last that long in my house. The hardened royal icing means you can stack them without worry, and they travel well in sturdy boxes or tins. I've learned to layer them with parchment paper between layers to prevent any accidental sticking.
Why This Recipe Wins Every Time
What separates these cookies from forgettable sugar cookies is the balance of vanilla flavor and the tender crumb that comes from proper creaming and restraint during mixing. The royal icing gives them a professional finish, but the real secret is that they taste like real butter and real vanilla, not imitation extracts or shortening. You can use these as a blank canvas for any theme, season, or celebration.
- Blue, white, and gold icing channels Pure Vanilla Cookie's aesthetic perfectly, but pastels work beautifully for spring or bold colors for holidays.
- If you're short on time, you can skip decorating and dust warm cookies with cinnamon sugar or sprinkles instead of using royal icing.
- Double the batch and freeze unbaked dough disks for up to three months; thaw before rolling and cutting for last-minute fresh cookies.
 Pin It
 These cookies remind me that baking doesn't have to be complicated to be meaningful. Simple ingredients, a little patience, and the willingness to decorate imperfectly make something that brings genuine joy.
Recipe FAQs
- → How do I ensure the cookies keep their shape?
Chill the dough for at least one hour before rolling. This firms up the butter, helping the cookies hold their edges during baking.
- → What makes royal icing different from other icings?
Royal icing dries hard and smooth, making it perfect for detailed decorations and stacking cookies without smudging.
- → Can I use gel food coloring for decorating?
Yes, gel food coloring is recommended as it provides vibrant colors without thinning the icing consistency.
- → How long should I let the icing set before storing?
Allow the icing to harden completely at room temperature, usually a few hours, to prevent smudging during storage.
- → What is the best way to store these cookies?
Store baked and decorated cookies in an airtight container at room temperature for up to one week to maintain freshness.