 Pin It
 The smell of cinnamon and nutmeg was already warming the kitchen when my sister walked in and asked if I was baking Christmas in a tray. She wasn't wrong. This cheesecake slab had become my solution to feeding a crowd without the fuss of a springform pan or the anxiety of slicing a perfect round. One year I made it the morning of our holiday party, chilled it just in time, and watched it disappear before the mince pies even got a look in.
I started making this after realizing round cheesecakes always left someone with a sliver too small or a wedge too generous. The rectangle solved everything. My mum tried a piece one Boxing Day, paused mid-chew, and said it reminded her of the spiced biscuits her grandmother used to bake, but creamier and less likely to break a tooth. That's when I knew it had earned its place on the table.
Ingredients
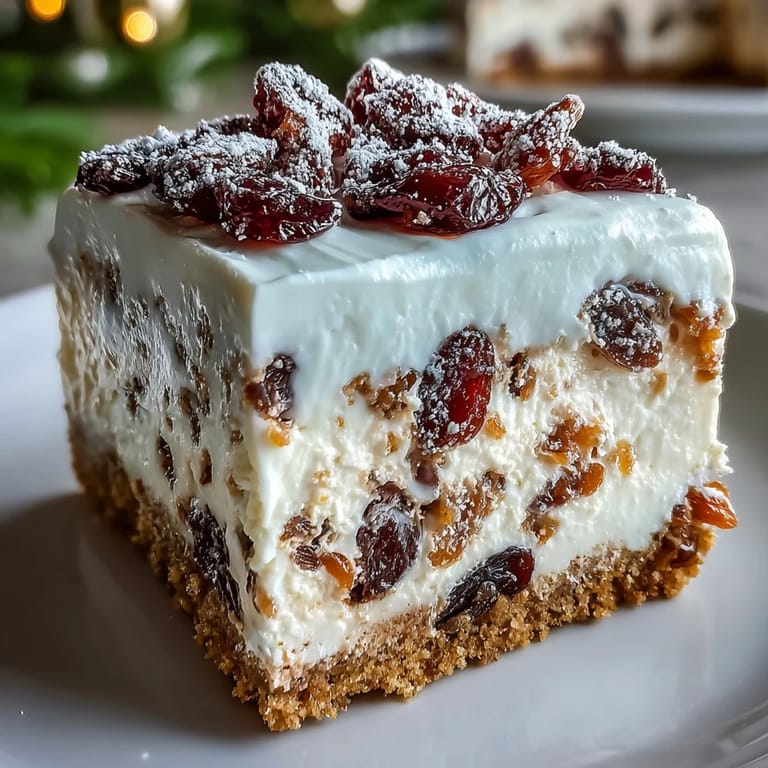
- Digestive biscuits: The buttery, slightly sweet crunch holds up under all that creamy filling, and they don't go soggy even after a day in the fridge.
- Unsalted butter: Melted and mixed with the biscuit crumbs, it binds everything into a base that slices clean and tastes like shortbread's sturdier cousin.
- Cream cheese: Room temperature is non-negotiable here, cold blocks create lumps no amount of beating will fix.
- Granulated sugar: Just enough sweetness to balance the tang without making it cloying or heavy.
- Sour cream: Adds a silky texture and a subtle sharpness that keeps each bite interesting.
- Eggs: They set the filling into that perfect wobbly-then-firm texture, so don't skip the gentle fold.
- Vanilla extract: A warm backbone that lets the spices shine without competing.
- Lemon zest: Brightens the whole thing, cutting through richness like a cold breeze through a warm room.
- Mixed dried fruits: Cranberries, apricots, and cherries add chewy pockets of sweetness and a festive pop of color.
- Mixed spice: Cinnamon, nutmeg, and ginger swirl through the batter like the scent of a holiday market.
- Double cream: Whipped soft and sweet, it sits on top like a cloud made of butter.
- Icing sugar: For the whipped cream and a final snowy dusting that makes every square look like a gift.
Tired of Takeout? 🥡
Get 10 meals you can make faster than delivery arrives. Seriously.
One email. No spam. Unsubscribe anytime.
Instructions
- Prep the oven and tray:
- Heat your oven to 160°C and line a 20 x 30 cm tray with parchment, letting the edges hang over like little handles. You'll thank yourself later when you lift the whole slab out in one go.
- Blitz the biscuits:
- Pulse the digestives in a food processor until they're fine crumbs, then stir in the melted butter until it looks like wet sand at low tide.
- Press the base:
- Tip the buttery crumbs into your lined tray and press down firmly with the back of a spoon or your fingers. Pop it in the fridge while you make the filling so it sets up nice and solid.
- Beat the cream cheese:
- Use an electric mixer to whip the cream cheese until it's smooth and cloud-like, then gradually add the sugar, beating until it's fully dissolved and glossy.
- Mix in the wet ingredients:
- Add the sour cream, eggs, vanilla, and lemon zest, beating gently until the batter is silky and uniform. Don't overmix or you'll bake in air bubbles that crack the top.
- Fold in the fruits and spice:
- Gently stir the chopped dried fruits and mixed spice through the batter, making sure every spoonful gets a bit of festive flavor.
- Pour and smooth:
- Tip the batter over the chilled base and use a spatula to spread it evenly. Tap the tray on the counter a few times to coax out any trapped air.
- Bake low and slow:
- Slide it into the oven for 45 to 50 minutes, until the edges are set but the center still has a gentle wobble. If the top starts browning too fast, tent it loosely with foil.
- Cool in stages:
- Turn off the oven and leave the cheesecake inside for an hour to cool gradually, then bring it to room temperature on the counter. This prevents cracks and keeps the texture velvety.
- Chill completely:
- Cover and refrigerate for at least four hours, though overnight is better. The filling needs time to firm up into sliceable squares.
- Whip the topping:
- Beat the double cream with two tablespoons of icing sugar until soft peaks form, light and airy but not stiff.
- Slice and serve:
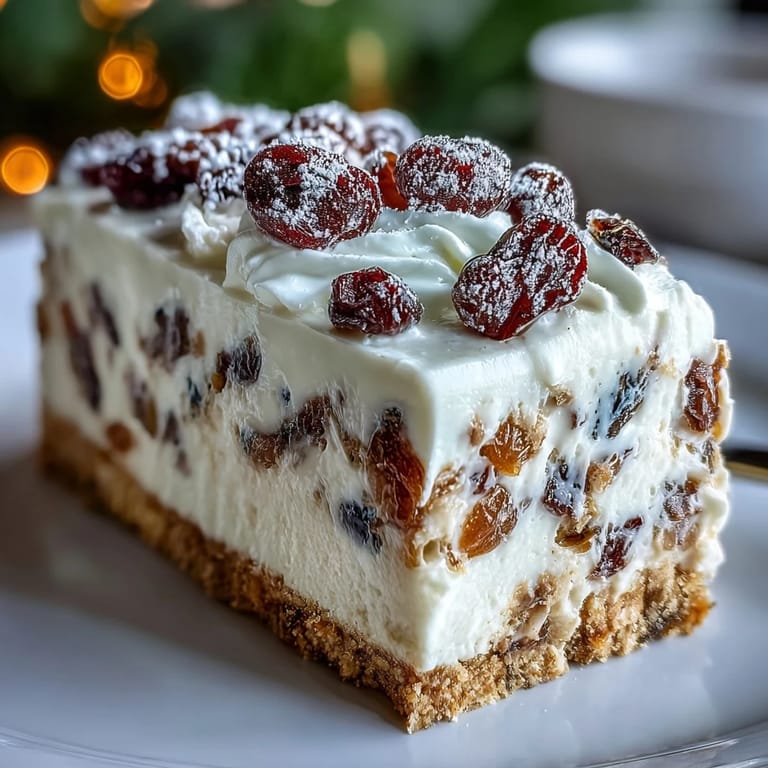
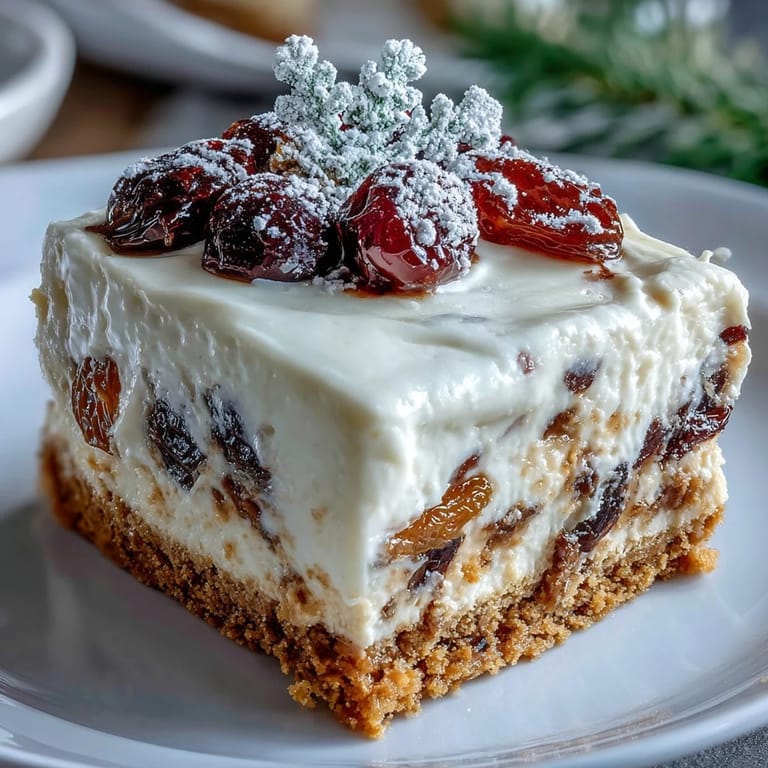
- Lift the cheesecake out using the parchment overhang, then cut into squares. Top each piece with a dollop of whipped cream and a dusting of icing sugar like fresh snow.
 Pin It
 The first time I brought this to a potluck, someone asked if I'd bought it from a bakery. I said no, just a tray and some patience, and she looked at me like I'd revealed a magic trick. That's the thing about a slab cheesecake—it looks impressive but doesn't demand the precision of a layered cake or the temperament of a soufflé. It's forgiving, festive, and always gone by the end of the night.
Making It Your Own
Swap the dried fruits for candied peel or fresh raspberries if you want a different kind of sweetness. I've also tried stirring in chopped crystallized ginger for extra bite, and once I replaced the mixed spice with cardamom and orange zest when I ran out mid-recipe. Both versions were devoured before I could decide which I liked better. The base recipe is sturdy enough to handle your whims.
Storing and Freezing
This cheesecake keeps in the fridge for up to five days, covered loosely so the top doesn't sweat. If you want to freeze it, slice it first, wrap each square in parchment, then stack them in a freezer-safe container. They'll hold for a month, and you can pull out just one or two when unexpected guests show up. Thaw in the fridge for a few hours, top with fresh cream, and no one will know it wasn't made that morning.
Serving Suggestions
I love pairing this with a pot of spiced tea or a small glass of dessert wine, something sweet but not too heavy. If you're serving it at a party, set out the squares on a wooden board with a bowl of extra whipped cream and let people help themselves. The icing sugar dusting photographs beautifully, so don't skip it if you're the type who likes to snap a picture before the first bite.
- Serve cold straight from the fridge for the firmest texture.
- Let it sit at room temperature for ten minutes if you prefer a softer, creamier bite.
- Garnish with a few whole dried cranberries or a sprig of rosemary for a festive touch.
 Pin It
 This cheesecake has become my December default, the dessert I make when I want something that feels special without the stress. It's the kind of recipe that makes you look like you planned ahead, even if you threw it together that morning.
Recipe FAQs
- → Can I make Christmas cheesecake slab ahead of time?
Absolutely. This cheesecake actually improves when made ahead—the flavours develop and the texture becomes creamier. Prepare up to 2 days before serving, refrigerate until needed, then add whipped cream and dusting just before serving.
- → How do I know when the cheesecake is properly baked?
The edges should feel set and slightly firm, whilst the centre retains a gentle wobble—similar to jelly. This residual wobble ensures a creamy texture once chilled. Overbaking leads to cracking, so remove from the oven whilst still slightly unset in the middle.
- → Can I substitute the dried fruits in the filling?
Certainly. Swap mixed dried fruits for fresh berries, candied orange peel, or even chopped pecans and walnuts for crunch. For a more traditional British twist, try mincemeat instead of dried fruits—the spices complement beautifully.
- → What's the best way to slice cheesecake cleanly?
Use a sharp knife dipped in hot water, wiping clean between each cut. For perfectly neat squares, chill thoroughly—at least 4 hours or overnight. Run the knife under hot water, dry quickly, then slice with gentle downward pressure without sawing motions.
- → Can I freeze Christmas cheesecake slab?
Yes, freeze individual squares wrapped tightly in parchment paper and foil for up to 1 month. Thaw overnight in the refrigerator before serving. For best results, add whipped cream and icing sugar dusting after thawing rather than before freezing.
- → Why does my cheesecake crack on top?
Cracking typically occurs from overbaking or cooling too rapidly. Bake just until set with a slight wobble, then turn off the oven and let cool gradually inside for 1 hour. This gentle cooling prevents sudden temperature changes that cause surface cracks.